Friday, November 4, 2011

The Dirt: Frosty Friends

 
For this month's edition of The Dirt, we're bringing you some Festive and Frosty Friends that are sure to cheer up any holiday display! Instead of painting the same green and red on everything, try this simple Snowman on a classic ornament shape!   

Pssst! As your studio fills up with customers hungry for new ideas, did you know you can print our project PDF's to hand out to painters? One studio told us that they keep the projects in an inspiration binder that they keep with their idea books. The Frosty Friends PDF can be found here. Check out our Technique Sheets area for more project ideas!  


Frosty Friends

Frosty never had it so good! This spunky little Snowman is sure to bring a smile to your face. Try switching up the designs and colors to make an adorable set!


MATERIALS

2061 Button Ornament
9591 Paint Dotters
9630 Detail Writer Bottles
9635 Fine Writer Tips
CN074-8 Really Red
CN141-8 Light Aqua
CN182-8 Bright Kiwi
CN253-8 Dark Black
CN504-8 Neon Orange
CN522-8 Really White Sprinkles
Assorted Royal Aqualon Brushes


TOOLS

Sponge
Ball Point Pen or Pencil


INSTRUCTIONS

1. Lightly wipe ware with a damp sponge to prepare surface for painting.

2. Sketch three interlocking circles onto the ornament with ballpoint pen or pencil. You may wish to trace the circles onto contact paper, then apply the contact paper to the center of the ornament. You can use the bottom of paint bottles or round stickers to create this shape!

3. Apply a thick coat of White Sprinkles around the Snowman. Use short brush strokes to evenly spread the sprinkles. Tip: You may want to prop your ornament on a stilt so you can easily access each side as the paint dries. Once the wash is dry, remove the contact paper by lifting the edge with a straight pin.

4. Add a little water to the Light Aqua. Using a round brush, fill in the snowman shape with a thin wash.

5. Using a thin brush, paint small dashes of color along the head and body of the snowman to create a scarf. Alternate using Really Red and Bright Kiwi to create a striped scarf and toboggan.

6. Using a Detail Writer with a fine tip, outline the snowman in short Dark Black strokes. Add dots and short dashes of black to create the effect of movement. Then, you can add black buttons, eyes, a mouth, and stick arms. Create a carrot nose with a short stroke of Neon Orange.

7. Dip a small paint dotter into the Really Red and create a dotted outline around the edge of the ornament. Fill in the spaces in between each dot with smaller Bright Kiwi dots. (We used the rounded end of a paintbrush.)

8. Using a fine tip detail writer, paint small snowflakes around the snowman in Bright Aqua.

9. Finish your ornament with a message along the bottom of the Snowman and on the opposite side of the ornament! You can write a holiday message, a family name or the year.

10. Let Dry. Dip in Pure Brilliance Clear Glaze. Fire to cone 06.


As always, there's tons more ideas and inspiration to be found in our Resources area.  Good luck, and enjoy the Holiday season!

Tuesday, November 1, 2011

What time is it? It's Warm Glass Clock Time!!!


Fall Back. My least favorite time of year. Don't get me wrong, Fall is my favorite time of the year...cooler air, leaves changing, candy corn, pumpkin pie, football, etc. are all awesome. I'm just not crazy about it getting dark outside around 5 o'clock.

So, what better way to ward off the Fall Back depression than a super happy fun happy super fun project. I could think of nothing more appropriate than making a clock, or actually clocks. This way I can put them all over the place as a reminder to set my clocks this weekend and hopefully I won't come to work an hour early on Monday.

Anyway, I hope you enjoy the following pics and get inspired to make your own clock! to make the clocks I decided to use white circle blanks to hide the clock body.

Clock 1

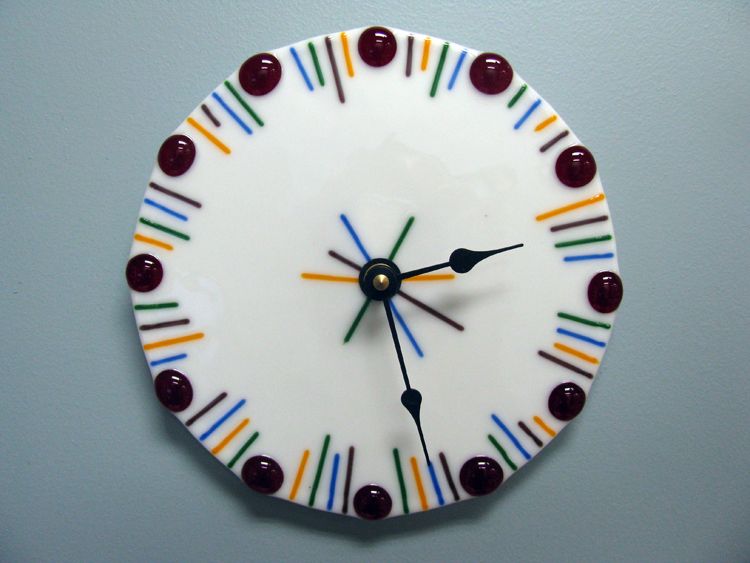
The first clock face I made didn't require the use of any tools. I used a sharpie to mark where the hour marks would go, which are represented by Cherry Red Pebbles. Then I added Yellow, Green, Purple and Blue Stringers for the minute marks. I didn't want them to all be uniform in length, so I just broke them at different lengths by grabbing all four stringers at a time and snapping them in my fingers the same way you would break a pencil, just in about 1" increments. I put a small bead of glue in between the pebbles and laid the Stringer pieces in place in random color orders. I just made sure all four colors were in between each pebble. Then I added pieces of the same four stringer colors in the center to tie it all together.

Materials:
8" White Glass Blank (#GBC8-200)
12 Cherry Red Pebbles (#GP151)
1 each of Yellow, Blue, Green and Grape Stringers from a pack of Mardi Gras Stringers (#SM96)
1 Clock Body (#8500)
1 Set of Clock Hands (8504)


Clock 2


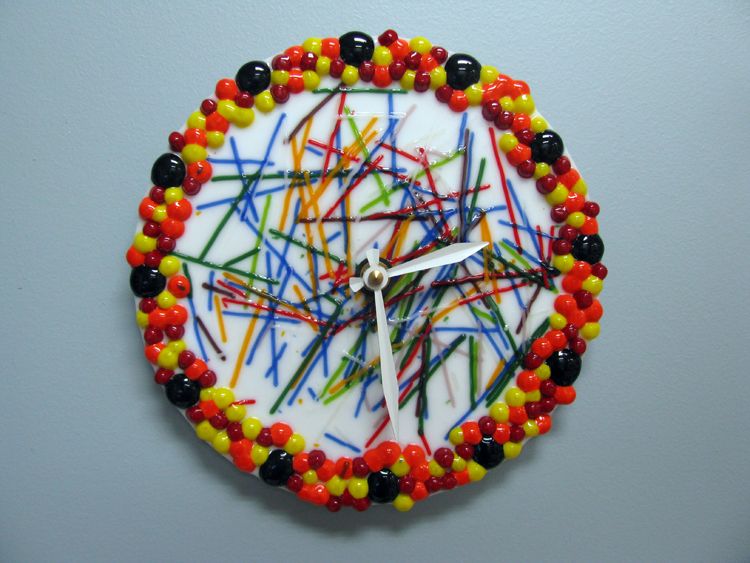
The second clock face only required the use of one tool, the Wheeled Nippers. I did the same pebble placement for the hour marks on this one, but used black Pebbles this time. I created a rim around the clock using Red, Orange and Yellow rod dots. I nipped two full rods of each color for the border. I didn't want all the rod dots to be the same size, so I just nipped them into a bowl. In the middle of the clock I used the full color assortment of Mardi Gras Stringers and broke them the same way as the other face, by snapping them in my fingers. As I snapped the stringers, I sprinkled them in the center and tried to cover the entire area.


Materials:
8" White Glass Blank (#GBC8-200)
12 Black Pebbles (#GP1009)
2 each of Yellow, Red and Orange Rods (#RO267-72-96, #RO2502-96, and #RO2702-96)
1 Clock Body (#8500)
1 Set of Clock Hands (8503)


Clock 3


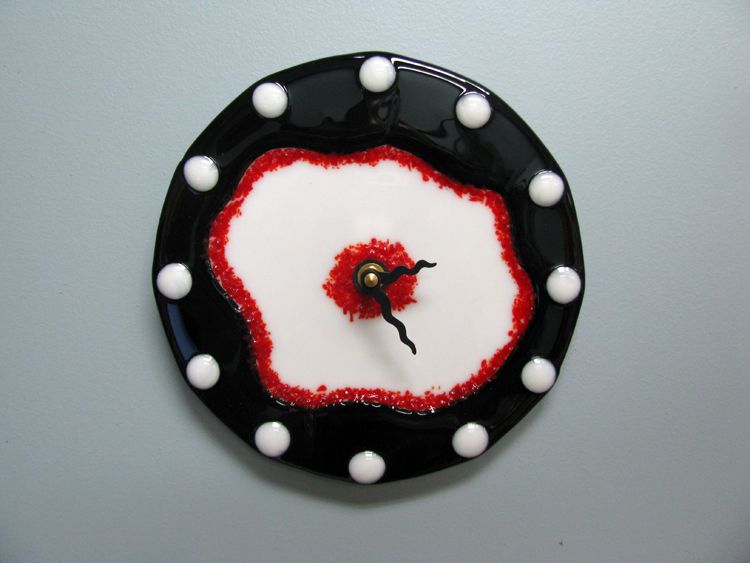
For the third one, the only tool I needed was a glass cutter. I would say this one takes a little bit of skill with the cutter and a good feel for running score lines. You'll see what I mean in a minute. I started with two blanks, one black and one white. I wanted to make a funky organic looking black rim around the white face. This is how I made the rim using the "self healing" properties of glass to my advantage. I call this the easy man's way to cutting rings, but this is what I was talking about when I said it required a little skill to do this piece. I cut the black blank in half and made a wavy arched score on one side. Then I laid the two halves back together so I could find the start and end points of the wavy arch for the second side and made that score line. Next, I gently ran the scorelines and broke out the two halves of the ring. That was the hard part. The cool thing is that the seams between the two will heal when the piece is fired. I glued the ring in place and then ran a bead of glue around the inside of the ring. Then I poured Red Opal Frit in the middle and brushed it into the glue to make the ring border. After that I made a circle of Red Opal Frit in the middle of the face and placed white pebbles to represent the hour marks and I was done!


Materials:
8" White Glass Blank (#GBC8-200)
8" Black Glass Blank (#GBC8-1009)
12 White Pebbles (#GP200)
Jar of Red Opal Frit in Medium texture (#2502-96-F3)
1 Clock Body (#8500)
1 Set of Clock Hands (8501)

After all three were made, the only thing left to do was contour fire them, drill 3/8" holes in the center for the clock bodies, and hang them on the wall.

To see pictures of the clocks before they were fired, go here

Wednesday, October 19, 2011

The Dirt : Handmade Holiday Plates

Is there anything more rewarding than giving a handmade gift? We don't think so! Make the gift that much more special by imprinting children's hands on a piece of art that will last forever.    
   
For this month's edition of The Dirt, we're bringing you not just one but two great plates that can be easily adapted to any holiday or time of year! With the holidays just around the corner, studios will be bustling with painters looking for inspiration.    

Pssst! Did you know you can print the project PDF's to give your customers ideas? One studio keeps the projects in an inspiration binder. Check out our Technique Sheets area for more project ideas!  

My Christmas Tree

This “Mommy and Me” project is one to cherish. Let the child leave their mark on the plate by decorating the Christmas tree while the parent embellishing the rim of the plate with seasonal rubber stamps.


MATERIALS

240 Rim Dinner
957-2 Really Red
9630 Light Kiwi
CN122-8 Bright Kiwi
CN352-8 Dark Kiwi
CN514-8 Dark Briarwood
CN516-8 Sunflower Yellow


TOOLS

FAB3602 Old Fashioned Gingerbread
9591 Paint Dotters


INSTRUCTIONS

1. Using a large wash brush, paint the child’s hand with Bight Kiwi and firmly stamp into center of plate.

2. Using paint dotters or the rounded end of a paint brush, allow the child to decorate the tree with dots, a base, and a star.

3. Using the Old Fashioned Gingerbread set, start to fill in the rim of the plate. Dip your leaf stamp into the Light Kiwi underglaze cup, and press firmly onto the plate. Make sure you check your paint and pressure on a piece of paper before you begin on your plate.

4. Using the candy cane stamp, dip into an underglaze cup loaded with Really Red. Stamp onto the plate, alternating directions and pressure for a varied look.

5. Go back over the rim of the plate by dipping the leaf stamp into the Dark Kiwi. Overlap with the light kiwi leaves to add dimension.

6. Finish the pattern by dipping the Gingerbread Man stamp into Dark Briarwood.

7. You may wish to add the child’s name with a thin detail brush around the base of the tree.

8. Let dry. Dip in Pure Brilliance Clear Glaze. Fire to Cone 06. 


Nora's Menorah

What has nine lights and ten fingers? This adorable menorah plate, of course! Add an accent rim to make this project pop off the plate! 


MATERIALS

240 Rim Dinner
CN042-8 Bright Papaya
CN142-8 Bright Aqua
CN253-8 Dark Black
CN511-8 Sunflower Yellow
CN518-8 Delft Sprinkles
CN519-8 Aqua Sprinkles
CN520-8 Caribbean Sprinkles
CN522-8 Really White Sprinkles


TOOLS

Assorted Royal Aqualon Brushes
Detailing Tape
Paper Plate
Scissors

INSTRUCTIONS

1. Using a large wash brush, paint the child’s hands with Bright Aqua and firmly stamp into center of plate, making sure to overlap the thumbs.

2. Using a thin round brush, paint simple black strokes to create the shape of the menorah around the handprints.

3. Create candles with a swipe of Sunflower Yellow and Bright Papaya.

4. Begin laying out your rim design by cutting varying strips of detailing tape. Lay them around the rim and smooth them down with the tapered end of a paint brush to prevent from leaks.

5. Once you have your rim design in place, cut a paper plate to fit over the menorah.

6. Start to fill in your sections by alternating Sprinkles colors. We chose not to follow a pattern, but rather to fill in randomly!

7. You may wish to add the child’s name with a thin detail brush around the base of the menorah.

8. Let dry. Dip in Pure Brilliance Clear Glaze. Fire to Cone 06.


As always, there's tons more ideas and inspiration to be found in our Resources area.  Good luck, and enjoy the Holiday season!

Studio Spotlight : Do*It*Yourself Crafts


What do you call a person whose mind never stops conjuring up innovative ideas?  A person that not only thinks of great ideas, but then calls to tell you about the idea so you can benefit from it too.  I call that person Julia McNair. 

All of Julia’s past experiences laid the foundation for her longtime career : owner of Do*It*Yourself Crafts in Birmingham, AL.  The experience she garnered from her work in sports marketing (public relations), retail accounting (inventory management), anthropology studies (history of ceramics), project management for an engineering firm (strategic planning) and even her time working in a bookstore and coffee shop (customer service) have help lay the foundation for the successful business woman she has become.  She is the perfect example of the fact that all experiences are useful ones.

You can’t help but like Julia McNair.  She’s not afraid to try something new and when she does it is always well-thought and she has every detail covered.  Plus, she has that southern charm that we all love.

So with all of that varied experience, how did Julia end up in the paint-your-own pottery industry?  After a management change in a job that she once loved, Julia found herself ready for a change of her own.  While considering her options (law school being one), she found herself crafting.  Her ultimate decision was to open her own crafting business that included both scrapbooking and rubber stamping but also offered a variety of crafting options.  She had painted pottery before but didn’t intend to include that in her store line up.  However, as a few local studios started to close, Julia decided to dedicate a 4’ section of her studio to pottery painting.   As the interest in different craft offerings changed throughout the years, Julia responded accordingly.  She brought in more of what worked and got rid of what didn’t.  She was wise to listen to her customers and to pay attention to what they want.  Today, she has a studio full of pottery, plus glass fusing, silver clay, tie-dye and mosaics.  Clay is also becoming a bigger part of the studio’s repertoire.  And if I know Julia, which I do, it will be a success!

A self-described dilettante, Julia truly enjoys trying lots of things.  She is not afraid to experiment and enjoys the process of creating a plan from start to finish.  One of her gifts is that she is good at helping customers.  Not just in a customer service way, but helping them realize that they can create something themselves.  When someone enters her studio and says, “I can’t paint.” – Julia’s response is, “Neither can I.”  Julia helps to demystify the process to a reluctant customer, which is pretty powerful. We could all use a little of that!


Having owned her studio for 12 ½ years Julia has seen a lot of growth in the industry.  Her favorite thing about our little world is how much peers help each other.  She loves that her fellow studio owners operate under the understanding that every good idea they have can be enhanced by someone else.  The willingness to share ideas is evident when you see a group of studios together.  Julia loves attending PYOP events and watching and listening to studio owners.  They truly love what they do and want the best for their colleagues – not just themselves.  Her philosophy is that anything she can do to help the industry helps her – even if it doesn’t directly affect her.  As Julia says, “In the end the circle comes around.”
 
In the same way studio owners enjoy watching their peers succeed, they relish in providing a positive experience for their customers.  Julia loves that her store is a part of so many people’s memories.  “Every Christmas hundreds of gifts are unwrapped that were made with our help,” said Julia.  “My biggest honor is helping people make things that they cherish.” 

So what are Julia’s secrets of success?  She’s empathetic.  She’s able to understand what the customer is looking for by truly listening to them and by paying attention to what they aren’t saying.  In addition to being a business woman she is a mom.  She is able to look at her business from the perspective of a parent coming in and is able to provide what her customers really want. 

The team at Do*It*Yourself Crafts has a system in place that keeps things going so that Julia doesn’t have to micromanage the store.  She knows that things are being taken care of and that the staff follows the plan.  This assurance allows her time to figure out what she will do next.  What type of event or program she’s going to implement or what her next new product launch will be.  What greater gift to a growing business than a leader that is free to lead!


When asked what advice she would share with fellow studio owners, Julia recommended that companies have web presence and maintain it.  “Be sure to keep your event calendar and website updated!  People want to see what’s new.   Engage your customers by using social media, but be sure to expand beyond that horizon.  Not all of your customers are tuned in to the magic of Facebook so be sure to meet them where they are.  I think the biggest lesson of all is to listen to you customers.  Doing so is vital to growing your business and giving customers what they want or don’t want.  Listen and respond accordingly.”

Julia is passionate about her business and our industry.  Owning your own studio is one of those jobs people dream about and Julia encourages every studio owner to enjoy what they do.  Sure, times can be tough and not all days are sunny, but the life of a studio owner is rewarding beyond compare. 

Do what you love, love what you do!
Crista

Tuesday, October 4, 2011

Halloween 2011 Project Ideas

Halloweentime is almost here! Are you ready for it in your studio? Customers are going to be looking for a great new piece, so make sure you update your samples from year to year! Feeling a little less than inspired? BI's got you covered.

Our glass guru, Chris, just posted a brand new project over on the Glass Bits Blog. Check it out! 

For those looking for a new bisque sample, we've also just posted a fun handprint plate that's sure to be a crowd pleaser.

Enjoy this fun time in your studios. Here's to boo-tiful creations!

Tuesday, September 13, 2011

Add a Little JOY to Your Season!

Is there anything more magical than the feeling of unearthing your boxes of Holiday decorations and displaying them around your home? We don't think so. And with ornaments of all shapes and sizes adorning one of our classic shapes, we can't help but love this project!

This month's project features an incredible platter we created with a mixture of several techniques and a whole lot of decorating fun!
 
With the holidays just around the corner, studios will be bustling with painters looking for inspiration. When directing them, you need look no further than the Joyful Holiday project!  The concept is simple, but the possibilities are endless. 


Joyful Holiday

Let your creativity shine as you design and decorate this festive plate! 

Materials

191 Square Platter 
9591 Paint Dotters
9630 Detail Writer Bottles
9636 Medium Writer Tips
CN074-8 Really Red
CN142-8 Bright Aqua
CN182-8 Bright Kiwi
CN183-8 Dark Kiwi
CN202-8 Bright Grey
CN244-8 Really White
CN518-8 Delft Sprinkles
CN519-8 Aqua Sprinkles
CN522-8 Really White Sprinkles
R2250-6 Aqualon Round #6 Brush
Assorted Royal Brushes

Tools

Pencil
Ruler
Sponge

Instructions


1. Lightly wipe ware with a damp sponge to prepare surface for painting.

2.Outline where you would like your ornaments to hang on your plate. You may want to use a ruler to sketch your strings.

3. Start with the background color of each ornament, then layer color and designs on top! We outlined each ornament with a detail writer to get a crisp edge. Then, we filled in several coats with a Round Royal Aqualon brush.

4. Once you have your background painted, you can fill detail writers with accent colors of your choosing. We chose to use CN244 and CN522 to make the designs pop.

5. Use paint dotters to make patterns, or layer different colors of blue and white to create a snow globe effect.

6. For our Christmas tree ornament, we carved out texture with the tapered end of a Royal Brush.

7. Now you are ready to write your message! We outlined our words with pencil, then filled in the letters with a detail writer of CN074.

8. Let dry. Glaze and fire to cone 06.

Tip: Keep it simple by sticking to a handful of colors. That way, your patterns and designs will really shine on the piece, while still feeling cohesive and festive!


For more project ideas and holiday fun, check out our updated Gallery! Happy Painting.

Friday, August 12, 2011

Christmas at BI

We're only 27 days away from the CCSA Convention in Birmingham, Alabama. Yes, we know it's only August. But we can't help it! CCSA time is like Christmas. We love all the hustle and bustle, new treats and fun things to do.

Kelci has been living in the studio, painting day and night to get everything ready to go. Of course we can't show you all our fun new projects just yet...but we can show you a little bit of our process!


We've got new glass, bisque, products and games ready to go. And guess what? We're driving it all down ourselves the day before. That's right, the entire BI Crew is piling into a van to make the trek to Alabama. Sound like a crazy idea? It is. Who knows what will happen when seven creatives join together for a wacky road trip. We can only imagine. Stay tuned for tales from the road.


Wednesday, July 27, 2011

Wire Decorators

Do your stencil and stamp designs leave a little to be desired? If you've looked for easier tools with better results, you're not alone! These wire decorator tools are great for getting the look you want with much less effort. We were excited to try these after a few of our customers recommended them to us. And what a great recommendation that was! Once we got started, we were able to create this beautiful platter in no time.

Each kit comes with a set of directions and a tin for your paint. Simply select the shape you want, dip into your paint tin, and stamp onto the piece! Make sure to dip your tool back into the paint between each application. It's also important to keep a thick layer of paint in your tin, so that the tool picks up an even amount. (Tip: in order to waste less paint, let the tins dry once you're done and create paint chips!)

We think these tool will be great for beginners and seasoned artists alike, since the possibilities and combinations are endless. The kits come with nine different shapes that you can mix and match to create patterns or shapes. We had a lot of fun with this project, and it was super simple! 

Hydrangea Haven


Your customers will love this sweetly springy platter!

Materials
177 Metropolitan Coupe Platter 
CN112-8 Bright Delft 
CN121-8 Light Nautical 
CN182-8 Bright Kiwi 
CN202-8 Bright Grey 
CN244-8 Really White 
CN263-8 Dark Grape 
CN342-8 Bright Pink 
CN505-8 Neon Green

Tools
KDS13 Decorator Set 1
9599 Hydra Art Sponge
9630 Detail Writer Bottle
9636 Medium Writer Tip
R2850-4 Royal Aqualon Fan Brush No. 4
RAQUA144 Assorted Royal Aqualon Brushes

1.   Lightly wipe ware with a damp sponge to prepare surface for painting.
2.   Layer CN244 and CN112 and CN121 on your palette. Dip a fan brush into the paint mixture, making sure to keep the colors separate. Spread in long horizontal strokes across the platter to create a sky. Remember to frequently refresh the paints to keep the colors distinct.
3.   Apply a quick coat of CN505 with a fan brush along the bottom of your platter. Create details in the grass with a quick light stroke of CN182.
4.   Using your square spiral wire tool, create butterflies with CN342, CN263 and CN262. Add lines and dots in alternating colors. Then, create the small butterflies with the diamond Kemper tool. 

5.   Dip the spiral tool into CN342. Start creating the shape of your hydrangea, dipping the tool into the paint between each application. Let CN342 dry for about ten minutes and start your second layer with CN262. Once that layer has dried, add a final layer of CN244 with your spiral tool to blend the colors.
6.   Use a Detail Writer filled with CN202 to fill in the shape of the flowers. 
7.   Add stems to your flowers using CN505 with CN182 accents.Alternate the leaf wire tool on either side of the stem.
8.   Let dry. Dip in Pure Brilliance Clear Glaze and fire to cone 06.

 We hope you enjoy this project! While you're at it, make sure to check out our improved Resources area with tons of Technique Sheets!

Happy painting :)  

Tuesday, July 19, 2011

Studio Spotlight: Bisque Imports Studio Advisory Board

 
Pictured from Left: Stephanie Magennis, Trisha King, Hillary Moulliet, Katie Yallaly, Shana Bridges, Julia McNair

I love working on a team. Hearing other people’s opinions and ideas is refreshing and helps the entire organization move forward together. Listening to our customers and acting on what they say is even better!

Earlier this year, the Bisque Imports Crew invited six of our customers to become the inaugural Studio Advisory Board. They graciously agreed to join us for a two-day discussion about how Bisque Imports can be a better partner to our customers and better member of the industry at large. Since they share the same values and passion for the industry as we do the guidance these studio owners gave us has been of utmost importance and value as we move forward. We asked for their feedback and boy did we get it! These savvy studio owners know what they want and were collectively a great voice of inspiration and to us. They challenged us to look at the way we present our products, gave us direction in product design and helped us understand what is really important to our customers. We have already begun implementing many of their suggestions and are working diligently to fulfill the items on their wish lists. It was really a fun meeting and we enjoyed the opportunity to get to know each other better personally and professionally.

The people within our industry are such a great resource! I have not seen other industries share as much as paint-your-own pottery studios and am always pleased to hear from any customer that calls with ideas, comments and constructive criticism. As our mission statement indicates: Bisque Imports exists to make our customers, company and industry successful through determination, creativity and passion.

Thank you to our Studio Advisory Board for sharing your time, ideas and passion for the industry with us!

Stephanie Magennis
Ceramics In The City
Denver, CO
http://www.ceramicsinthecity.com/

Trisha King
The Royal Brush
Columbia, TN
http://www.facebook.com/pages/The-Royal-Brush/115943734430?sk=info

Hillary Moulliet
Art Space Studio
Charlotte, NC
http://www.artspacestudio.com/

Katie Yallaly
Doing Dishes
Jacksonville, FL
http://www.doingdishes.com/#!

Shana Bridges
Sunshine Glaze
Southlake, TX
http://www.sunshineglaze.com/

Julia McNair
Do It Yourself Crafts
Birmingham, AL
http://doityourselfcrafts.com/

Do what you love, love what you do!

-Crista

Tuesday, July 12, 2011

New Glass Bits Blog


Hello friends! We've got a new glass project for you! Head over to our Glass Bits Blog to check out the Nifty Name Plaque Project. http://bit.ly/oSMFTc

From now on, all project ideas and blog content will be located here, so you're in the right place! Chris will still be bringing us all the best advice on glass fusing, and Crista will serve up the studio spotlight, while I'll bring you everything in between! Now it's one blog with three times the content. Sounds pretty sweet to us.

We're working away on tons of great things that will soon be coming down the pipeline, straight into your studio. Stay tuned!

Wednesday, June 29, 2011

A Letter From a Friend

 We recently received an email from one of our favorite people. She needs our help, and you can help too! Ready? Okay. Read on!

"Greeting from Afghanistan!
Hey Ladies  & Gentlemen! Remember me?  Amanda from Hearts of Clay, but now I’m Amanda from Afghanistan….well, temporarily anyhow. I think everyone knows that I sold my beloved PYOP for the fun & excitement of an 1-year, all expenses paid trip to the mountains of Afg, thanks to the great US Army.  Well, we are having a fun time here, as much as can be had.  But, the reason I am emailing…..
Once a week I volunteer at hospital here on base that treats sick & injured Afghan men, woman, and children.  Well, when I say volunteer, what I really mean is I go hang out with the kids, read, play school-yard games, and assist with a small literacy program.  You know, kinda what we do in our studios, but with armed guards, and no glazing afterwards.  These children have really touched my heart and I want to do everything I can to make a difference and make their world a little brighter. 
This is where I need your help.  I need used children’s shoes.  So I am asking you to consider having a shoe drive this summer at your studio.
FAQs:
Why used shoes? Over the 10 years, there have been several shoe drives such as the one I am trying to have, and new American shoes have been found their way to the market to get sold.  Used shoes won’t sell at the market, so the kids get to keep them.  Yes, this is a sad fact of their way of life.
Why Aug 4th? Its my husband’s birthday. Other than that, no real reason, your studio can pick whatever date is convenient for you.  We will set aside a date approx 2 weeks after all the shipments come in to hand out the shoes,  and we will have pictures of the happy kids & their shoes!

Why do these children not have shoes?  Well, the Taliban is a fundamentalist Islamic group that, once they took over Afg, banned women from working outside the home.  So, when most the male members of the families died in the last 30 years of war, women have very little means to provide for their children.  Any money earned goes towards food. 
OK, I have shoes….where do I send them?
Amanda Kane
228th TTSB
BAF
APO, AE 09354

Thank you so much for your help, and I hope you choice to take on this small project that will have a lasting impact on these children for years. "


Monday, June 27, 2011

Your Summer Camp Domination Station


 Now that summer is in full blast (just like your air conditioners, if your weather is anything like ours!) you may be looking for some tips and ideas to refresh your summer camp program.


You've probably hosted a few sessions by now, and are just now getting a feel for what works and what doesn't. Let's face it: hosting a group of kids every day of the week while keeping them interested and inspired isn't the easiest job. After five years of running the summer camp program with one of my close coworkers, I certainly understand how camp can be: even when you know what you're doing! Few studio tasks are as challenging and rewarding at the same time. We don't want your camp experience to just be “okay”, we want to see your programs flourish! 


So we thought we'd give you a few pointers, and would love to hear your feedback. What works for you? What doesn't?

We'll start with some ideas on how to gain interest for your camps. Tips won't be of any help if you don't have campers, now will they?

  1. Print flyers explaining the program with prices and times.
  2. Staple camp information to each customer receipt and make sure your employees are knowledgeable about your programs.
  3. Offer two-for-one or sibling discounts when parents sign up two campers. Promote any specials you have in your email list!
  4. Switch up your curriculum each week to encourage parents to sign up their children for multiple sessions.
  5. Dedicate a shelf in your store to displaying the latest and greatest camp artwork. This will get the conversation going and raise interest in your programs!

Phew. Now that you've gotten them signed up, what are you going to do with them? Without further ado, we present:

OUR TESTED, TRIED, TRUE AND TOP TEN TRICKS TO ROCKING SUMMER CAMP.

  1. Schedule your camp with your other customers  in mind. It helps to have camp in either a time or place that will minimize it's impact on your other customers. Try starting camps an hour before you open in the morning, or host them in a private room or out of the way table. Whatever you can do to keep the group contained will benefit your other business tremendously.
  2. Start the week by playing a few introductory games with the kids. If they feel more comfortable with you and the other campers, I guarantee it will make your job easier! When the kids can interact, they'll be more excited and involved with the projects. Go around the table and ask names, grades, and a funky fact. Don't forget to include yourself! (Campers love to hear that you're in "30th grade" ;))
  3. After getting to know the kids a little bit, you'll be able to give more personal and helpful instruction. But sometimes, two or four hands just isn't enough. Ask the campers who wants to be your “helper” for the day. Sounds crazy, but I promise you'll get some volunteers! The kids will feel special getting to go behind the counter to wash palettes and spray the table to clean up. This works really well when you're stretched to your limit!
  4. Have a few small prizes for the kids. Sometimes, we'd offer a lollipop or a silly band to the best behaved camper that day. But my favorite game of all is “I Spy a Magic Scrap”. After messy cutting, painting, or mosaic projects, fix your eye on a single piece of paper or blob of paint. Then, tell the children that they have 2-3 minutes to clean up. Whoever cleans the spot you picked out gets a prize. Kids get really excited about this game and it will do wonders for the strenuous transitions between projects!
  5. Try to avoid down time however possible. The last thing you need is a hyper group of kids running around the studio! Plan a few “filler” projects to do with the kids should one of your projects finish early, or if all the kids are working at different paces. Some of my go tos are: Origami Fortune Tellers  7-up (or 3-up, if you don't have many campers!) or Perler Bead projects  that you can make into magnets for an easy Make and Take on the last day of camp. We even painted a hang man and tic-tac-toe game on one of our 8'' tiles for campers to use with dry erase markers.
  6. Engage with your parents, too. If you notice a child is having trouble, ask if the parents have any ideas. Open lines of communication will make the parents feel more at ease (and much more likely to spread the word about your fabulous program to friends)
  7. Have your kids decorate their own camp bags on the first day. (Make sure their name is prominent and easy to read!) That way, as projects finish throughout the week, you can stuff them into their bags. On the last day, they'll have their projects all in one place and ready to go! Easy-peasy.
  8. A fun project for the last day of camp: have your kids make thank you cards for their parents. I like to teach them how to make pop-up cards with messages inside. The parents will really appreciate the extra thought.
  9. Make sure you have parents fill out basic information on their children, including doctor's numbers, emergency contacts and any allergies that they may have. You never want to be in a situation where you don't have this info!
  10. And finally, the number one most important thing you can possibly know about managing summer camps: PLAN! Plan, plan, plan. NOTHING will replace forethought and insight into your campers' and studio's needs. Have a well thought out (but incredibly flexible!) schedule made up before the first day of camp. It's always a good idea to stay one step ahead of the camp. While the children work on one project, get started setting up for the other so you can quickly transition once they're finished. If possible, set the projects up at different tables so once the kids are done they can just switch over and leave clean up for later. Nothing creates chaos faster than rushing to catch up with the schedule. You can recycle the flow from week to week, and by the end of the summer, you'll be a time management pro and a camp counselor champion all in one!

    Woohoo! Now you've got ten more butt-kicking tools in your toolbox. The next time that first camper walks in your studio door--you'll be ready!